Whenever I join a project, I have to set up the right development environment on my workstation. Normally, there’s someone around to tell me what compiler they are using, the basic structure of the repo, and the popular pages on the company-internal wiki.
What about jumping into a legacy project? You’re on your own!
Welcome Aboard

One of the big problems I find in the world of embedded engineering is the lack of a smooth onboarding process. I’m not referring to joining a new company. Human Resources (HR) and Information Technology (IT) teams in any company of 50+ people will have a smooth flow, and you’ll be ready to participate in the company after your second day. I say the second day because you have to do all that HR and IT orientation. How about onboarding to a project?
Onboarding to a project can be hard. Before you can run the code, you will need to be set up with source control tools, editors, compilers, programmers, and the target hardware. This onboarding can happen when you join a company, change teams, or swap projects. It can also happen when you resurrect an older project. Oftentimes, there is someone else in the team who has done this before, or has the toolchain on their machine. Sometimes, you inherit a project from someone who has already gone and, hopefully, they left you some guidelines. How bad can it be?
The Case of the Inoperable Ethernet
Imagine you are a mid-career professional and you’ve just changed jobs. You’ve been an engineer for, let’s say, 18 years and five companies. You have done firmware, software, gateware, ASIC Design Verification (DV). Your computers have been UNIX, Mac System7, Windows (everything from 3.1 through 7 pro), and RISCOS. You’ve worked with Arm, 68K, custom. You’ve coded in assembly languages, C, C++, VB, Verilog, Perl. You are ready for almost anything life can throw at you.
So, here’s the company wiki and repo. Front and centre, there is the readme.txt, which tells you exactly how to set up your system for development. After a day of downloading, installing, and configuring, you are ready to pull the repo, launch the IDE, build, and flash the target.
I followed the instructions verbatim. I also had a mentor walk me through some parts of it as they wanted me to have a smooth transition into the workflow. I don’t think I’ve ever had a development environment come up so quick. I was very pleased to see the code build be very clean (they had enforced “warnings as errors” and static analysis tools, so yes, it was clean). We moved the binaries to a lab machine and programmed up the target hardware. The appropriate lights blinked, and everything looked alive.
I could now start my real work. There was a bug in an IPC (inter-processor communications) channel. Occasionally, data was getting lost. Anyway, a week or two later, I’d gotten the IPC running better. I’d been looking at this subsystem on a mostly idle system, and it was time to make sure a loaded system would behave well. This was when we found that the ethernet on the hardware I was using was compromised. I’d not touched any of the networking software, so we knew that wasn’t the problem. The issues I’d been working on were on a smaller bus, I think SPI, but again, that’s not the point of the story.
Just to eliminate my code changes, I pulled from the main branch of the repository, a blessed known working code base. With this built and flashed, my board was still not getting any network traffic. I must have bad hardware.
Let’s talk about the hardware a bit. This was a rack-mounted tray with a half dozen boards in it. There was a backplane hosting several signal processing boards and a main-board that had multiple MCUs and SoCs to build the full solution. I was working on main-board code for the IPC between a heavy-duty processor and a lightweight management device. The system had been built of spare parts for me before I joined. The team had done a good job, and made sure everything was right before I got there.
So, blessed code and blessed hardware, but still not working? This is a three-legged stool. Yes, there is a third variable, namely the toolchain.
So, what do I mean by toolchain? It typically means your code editor, the build system (compile, link, load), the programmer, and the debugger. You can also add any SDK or Libraries, though they are sometimes considered part of the code base. And, of course, there is the host system, your computer hardware, and its operating system. You need to make sure you are running the right version of everything, with all the settings and preferences set appropriately.
It took a bit of back-and-forth, and we thought I had everything by the book. We even reached out to our vendor (WindRiver) only to find the one fatal flaw. As the new hire, I had, as instructed, downloaded the tools from WindRiver. I forget now if this was VXWorks or Tornado, but, whichever it was, I had the latest version. Everyone else on my team had the previous version. The libraries around networking had changed subtly and were not reverse compatible.
How had I gotten the wrong version? The real bug was in the readme file. I’d been pointed to the official WindRiver webpage for downloads and told to download from there, and that was all it took to mess me up. The missing information was a specified version of the tools from the vendor. It’s a simple mistake. In the months between the last person being onboarded or migrating to a new development machine, the vendors released an update that was not appropriate for us. I immediately fixed the installation guide for our project set-up.
The documentation has to be complete. Just naming a tool and linking to the downloads page is not enough. You need to specify the version.
The Factory Script that Stopped Working
Another one of my projects was an aside from our main company business. I was building a system that we could use to evaluate technologies we were investigating regarding image capture systems for AR (augmented reality), over-capture, photogrammetry, and light field. We were working with two film crews who had applications for our technology, which at its core were genlock or “house sync” and remote control. This was very much a small team in a big company doing the R side of R&D.
It was a relatively small industry, and a notable customer saw a want for our system in the order of a thousand systems. Each system was composed of nodes, anywhere between six and a hundred. Each node is connected to its neighbors and a camera. The customer decided they needed 16 nodes per system.
As you can imagine, we’d been getting a local CM (contract manufacturer) to build a few dozen at a time, and our team was responsible for providing factory support as well as our research engineering before the large order.
The new volume did get some resources added from other teams to hurriedly productize the prototype device for the larger run, but my team still had the flashing scripts to take care of.
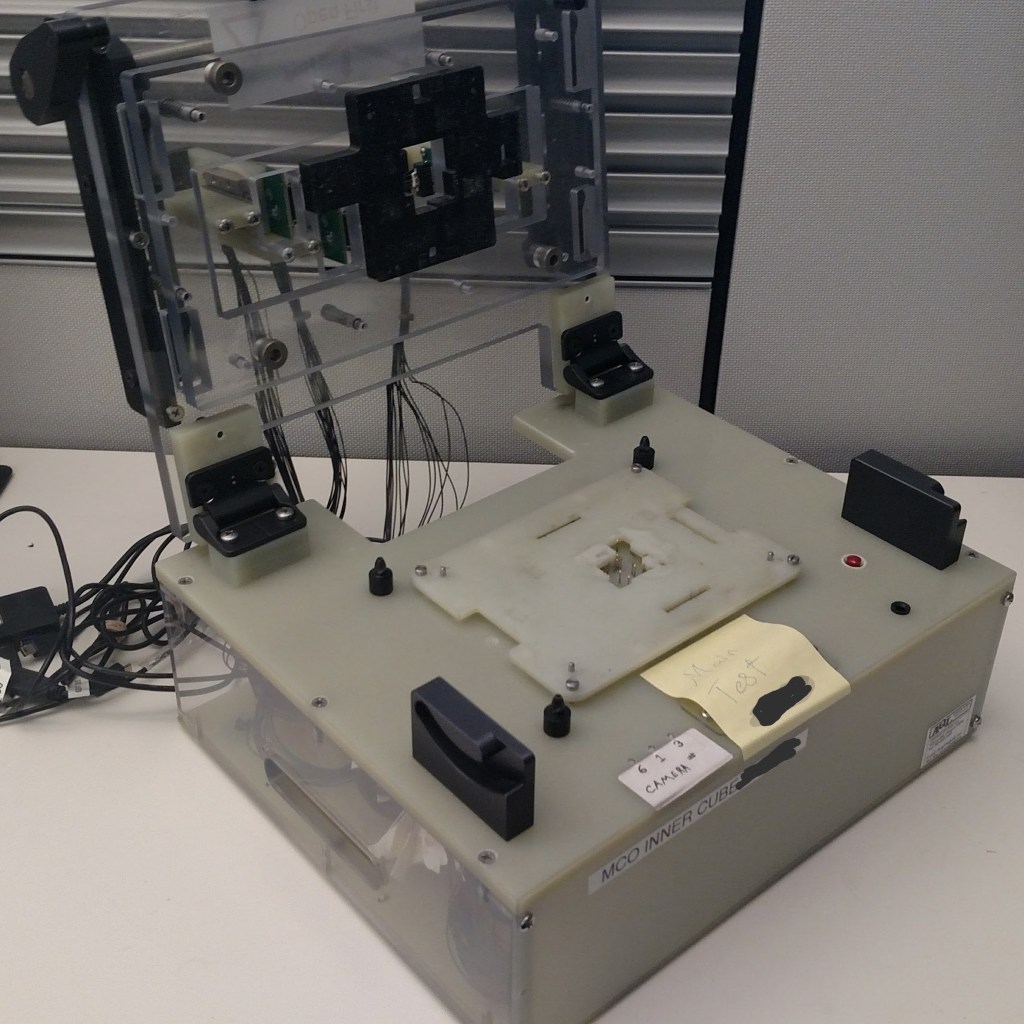
MCO Inner Cube.The flashing procedure was multi-step, having to hold the MCU in reset while we loaded the FPGA bitstream to a shared flash device. I was struggling to get a bat file to run the CLI programmer until a newer release of STM32_Programmer was released; we had a manual GUI based 10 step procedure, just about manageable in-house. This would never fly at the CM.
I wish I could tell you what the difference was. There was a subtle update in the CLI that permitted us to script our sequence rather than use the GUI. I was down to a one click process for the operator, and our yield went from 60% to 99%.
There was an update to the firmware while I was on PTO. One of my team drove the release in my absence, but the flash script failed for him, so he restored the GUI workflow. Our yield suffered. The problem was isolated to his local workstation, but that meant he assumed the factory would have the same issue.
I must not have documented the version requirement in the script. I know for sure that the project had its tools documented on the wiki, but I found I had not updated the local README.txt. In my absence the best efforts were made.
Moral of the story – document in one place only, and document the toolchain as close to the source code as possible. Of course this one would also need to be documented in the factory procedure, but you get my point, the fewer places you document, the fewer places you have to maintain.
Documenting in the code repository would’ve had the documentation associated with the release, not the project, throughout time.
Dropped in the Deep End
Occasionally, you get to walk in the door and find that you are “The” domain expert, not an addition to the team. For whatever reason, someone has started a project, and you have to resurrect it. Actually, I left one company after the project completion. It worked and there would be no need for an update for at least three years, unless a critical bug came up. Well, four years later, that company won the bid for the upgrade, and I wasn’t available to go back, so they used another engineer. I don’t know how much fun they had with the mess a 28-year-old me had left them, but they got it out the door. Three years later, I’m back in there. I’m looking at code that had someone else’s changes as well as my original code. This time around, though, we were looking at replacing an end-of-life MCU, so how much legacy tooling did I need? As you can see, it happens. The project could’ve been mothballed for months or years before the reboot. You can’t rely on having a person to talk to, even if you could, they may well have forgotten.
I recently jumped into the deep end again; different client.
There was a readme.txt, and it states:
Windows 10
Install:
Install IDE Microsoft Visual Studio Code
IDE Segger Embedded Studio for ARM
nrfconnect
nrf-command-line-tools
python-3.9.0
JLink_Windows_V792

nrfconnect -  destination path c:\Nordic
 - Install Toolchain Manager
 - Install nrf Connect SDK v1.7.1
 - Install nRF5_SDK_17.0.2_d674dde
It looks pretty clear. We have a prerequisite of Windows 10, and then a bunch of stuff to install. And yet I still managed to mess up. I had to perform web searches to find all the tools.
You would think that would go quick, but the Segger Embedded Studio license almost cost me $1,200, which just felt wrong. The web search took me to Mouser, a supplier of electronic components; they sell licenses for developer tools like the Segger IDE.
It took me about half an hour before I found on Seggar’s web page stating that I could get a free license from the chip manufacturer, in this case, Nordic Semiconductor. A breadcrumb for that would have be nice.
I decided to install all the tools before I tried running them. Seeing nrfconnect listed twice, lines 5 and 10, left me a bit confused, but I found that there was an SDK (software developer kit) and a desktop tool to download.
If you have installed programs on Windows, you will be familiar with the type of installer that gives you radio buttons and checkboxes to pick which feature you want to install. Seeing the list for nrfconnect indented with hyphens, I was expecting the installer to offer those choices. That did not happen. Still, I’d found both the SDKs required, I just hadn’t found the Toolchain manager, which sounded like it would be a helpful tool to have.
It came time to build, so I launched the Segger IDE, loaded what seemed to be an acceptable project file (.emProject), and chose a credible build target, in this case, project-name as opposed to the defaults of release or debug. The result – not a clean build. It was getting late on Friday, so I just confirmed if any build target would successfully compile, and the answer was no. I assume the code was building when my predecessor left off, so I started the weekend feeling somewhat saddened. I must have installed something wrong.
So, after a reasonable sulking time, I did get to look again. Though the requirements had been for a Windows install, I know those requirements were coupled to other parts of the project, not monitoring the Nordic device. Sometime on Friday, I downloaded the nRF Connect desktop app to my Macbook. That was an easy mistake as I was remotely connected to my Win 10 box from my Mac, and kept bouncing between the two systems as I dealt with emails. For grins, I fired it up, and to my horror, I saw this
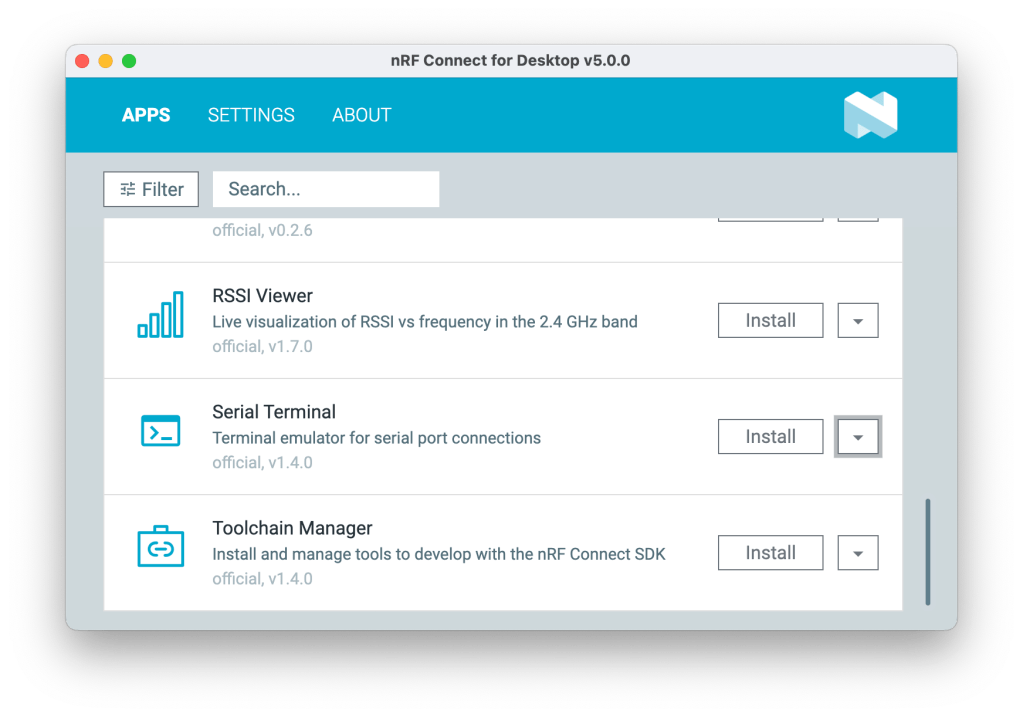
So, the instructions were wrong, and I was wrong, too! I had initially taken the blank line 9 to be the result of an accidental carriage return, making it one long list. When I saw the “bullet-list” telling me to install components, I had thought they were options I’d see in the installer, not the app. Our readme should look more like:
Prerequisite:
  Windows 10

Install:
  Install IDE Microsoft Visual Studio Code
  IDE Segger Embedded Studio for ARM - from Nordic website
  nrfconnect desktop app
  nrf-command-line-tools
  python-3.9.0
  JLink_Windows_V792

Run:
nrfconnect -  destination path c:\Nordic
 - Install Toolchain Manager
 - Open Toolchain Manager
 - Install nrf Connect SDK v1.7.1
 - Install nRF5_SDK_17.0.2_d674dde
It’s a subtle change and still not perfect, but will get us to this screen, where we find SDK 1.71 is “ancient history”, but at least still available.
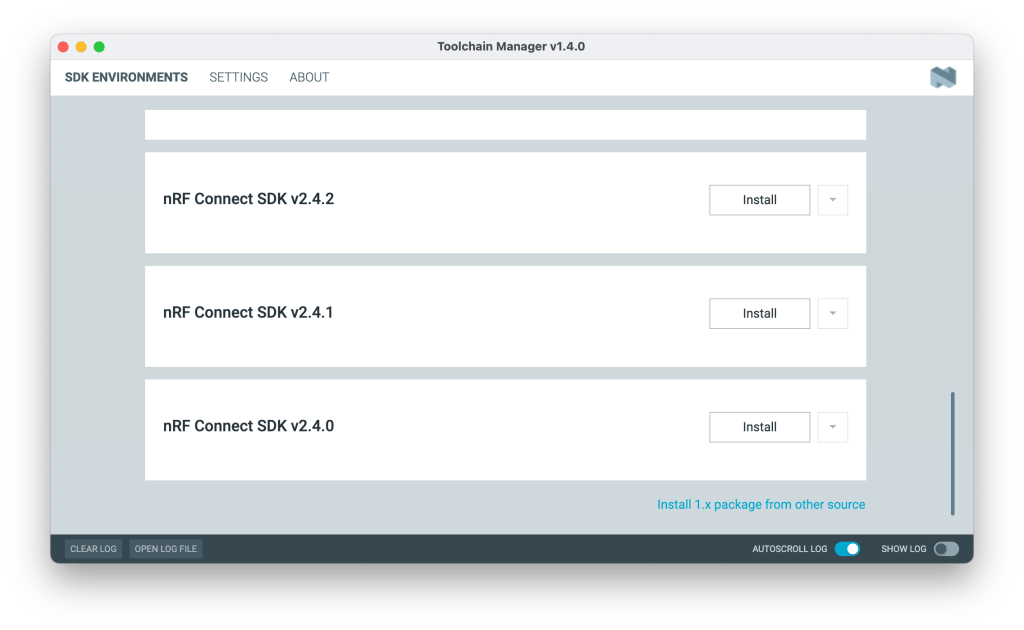
Can you imagine if our readme could have screenshots like that! Yes we can, but that’s a different story – let me say “markdown is your friend”.
How much readme is too much?
Documentation can get tedious. I had one boss who would screencap every stage of the installation and put that on the wiki. It was great, but when the tool was updated, the install flow sometimes changed, too.
Why put up the whole installation? Some tools have several pages of options you can go through during the installation. Once installed, there are several key user settings to set up, too. The screen caps are almost infallible.
The problem with these big installation guides is that they were on the wiki because they were image-rich. We ended up with each tool having a landing page and then sub-pages containing per project, per version set-up guides. Navigating these gets to be cumbersome.
We also had expert and novice install guides. The key information was distilled into terse bullet points for when you just needed a refresher.
Too much documentation slows most people down, but you need all the information. Whether you use marked-up screencaps, tables, or bullet lists, you need to provide all the information. Our initial example was not clear on which items were part of a shopping list and what was a step-by-step process; that adds to the fun.
There’s another trap that gets everyone eventually. When you start a fresh project, everything is just “the newest version” — you don’t think to write it down because it’s obvious. You’re also feeling your way, so there are things you don’t know you’ll ultimately need. You install something to get over a problem, it works, you move on. It gets forgotten. Six months later, on a new machine, you’re starting from scratch wondering what you had.
URLs are a minefield. A link to a vendor’s download page looks helpful, but it’s a trapdoor — click it six months later and you’ll get whatever’s current, not what you need. I learned that the hard way with WindRiver. The opposite problem is just as bad: a link pinned to a specific release page will be a dead link inside a year, and then you’ve got nothing. The sweet spot is a stable landing page URL paired with a version number written out in plain text. The URL gets you to the right neighbourhood; the version number tells you which house.
I would love to give a perfect example readme, but I don’t think I’ve encountered one yet. I leant on an AI agent – ChatGPT – to help me fix the readme we’d been looking at, using markdown.
# Project Name

## Prerequisites
- **Operating System**: Windows 10
- **IDE**: Segger Embedded Studio for ARM (download from [Nordic website](https://www.nordicsemi.com/))
- **Additional Tools**:
  - nrfconnect desktop app
  - nrf-command-line-tools
  - Python 3.9.0
  - JLink_Windows_V792

## Installation

1. **Install IDE**: Microsoft Visual Studio Code
2. **Install Segger Embedded Studio for ARM**:
   - Download from Nordic website
   - Follow the installation instructions provided by Segger
3. **Install nrfconnect Desktop App**:
   - Download from the official site
   - Install to `C:\Nordic`
4. **Install Additional Tools**:
   - nrf-command-line-tools
   - Python 3.9.0
   - JLink_Windows_V792

## Setup

1. **Toolchain Manager**:
   - Open Toolchain Manager in nrfconnect
   - Install `nrf Connect SDK v1.7.1`
   - Install `nRF5_SDK_17.0.2_d674dde`

## Building the Project

1. Open Segger Embedded Studio.
2. Load the project file (`.emProject`).
3. Select the build target: `project-name`.
4. Build the project.

## Troubleshooting

- **Build Errors**: Ensure all tools are installed as per the versions specified.
- **Network Issues**: Verify hardware connections and toolchain compatibility.

## Resources

- [Nordic Semiconductor Documentation](https://www.nordicsemi.com/Docs)
- [Git Version Control](https://git-scm.com/doc)
It’s not perfect, but you can see what we are striving for.
A template readme
While looking around a repo hosted on Azure DevOps I did find a well laid out README.md.
# Introduction
TODO: Give a short introduction of your project. Let this section explain the objectives or the motivation behind this project.

# Getting Started
TODO: Guide users through getting your code up and running on their own system. In this section you can talk about:
1.	Installation process
2.	Software dependencies
3.	Latest releases
4.	API references

# Build and Test
TODO: Describe and show how to build your code and run the tests.

# Contribute
TODO: Explain how other users and developers can contribute to make your code better.

If you want to learn more about creating good readme files then refer the following [guidelines](https://docs.microsoft.com/en-us/azure/devops/repos/git/create-a-readme?view=azure-devops). You can also seek inspiration from the below readme files:
- [ASP.NET Core](https://github.com/aspnet/Home)
- [Visual Studio Code](https://github.com/Microsoft/vscode)
- [Chakra Core](https://github.com/Microsoft/ChakraCore)
Summing up
I think the best way to wrap up is to give you the outline for a good readme.
- Project
- say what project this readme is for.
- Prerequisites
- The assumed starting point, such as OS, PC specifications, etc.
- Hardware requirements
- List HW tools such as programmers, debuggers, monitors, etc
- Name
- version
- source(s)
- Development systems
- Any SDK, prototype or product
- Any associate breakout boards and cabling
- List HW tools such as programmers, debuggers, monitors, etc
- Software Installations
- List the software to install
- software name
- version
- source
- where it’s used in the project.
- step-by-step installation for this software
- List the software to install
- Software Set-up and usage
- Point to any configuration files in code base
- key parameters
- How to run the tool (basic)
- How to update SW
- For each software
- update policy (oldest/newest version)
- Mechanism used (auto update, resource manager, updater, uninstall/reinstall.
- For each software
- Troubleshooting/FAQ
- If you make a mistake, log the fix; someone else will make the same mistake eventually.
There are other considerations. If the repo contains code for a board with an MCU, FPGA, and SoC, well, that probably needs three readmes as each codebase has a separate toolchain. You will find some team members only need to flash an image to the board, and not need the build tools. You would tabulate why the software is needed, so the user could just install a subset.
Some day I’ll tell you about the shell script I wrote that validated the install and ensured the versions installed were the right ones. For now, though, I think I’ve taken enough of your time.
Glossary
- FPGA (Field-Programmable Gate Array) — a chip that can be configured after manufacture to perform custom digital logic. Unlike a microcontroller, which runs software, an FPGA is programmed with a hardware description that defines its circuitry. They are common in embedded systems where performance or flexibility matters.
- Bitstream — the binary file that configures an FPGA. Loading a bitstream is roughly analogous to flashing firmware to a microcontroller, except you are defining hardware behaviour rather than software instructions.
- Genlock / house sync — a technique for synchronising video signals across multiple cameras or devices so they all produce frames at exactly the same moment. Essential in broadcast and film production; without it, cutting between cameras produces a visual glitch at the edit point.
- Bat file (batch file) — a plain text script with a
.batextension that Windows executes as a sequence of command-line instructions. The equivalent of a shell script on Linux or macOS.
About the images
All my own photos again.
- Fig 1. Coastguard training off the aft of the USS Hornet. One of those “right place at the right time” photos, blessed with a digital camera and long lens, so I could get many good shots of the full operation.
- Fig 2. Tornado Shelter sign taken on a work trip to Illinois. Just a fun image to accompany the WindRiver story – though I could go get a photo of their local office.
- Fig 3. Somewhere along the path, the clamshell programmer/test station made its way from our CM back to our office; through a downsizing, the jig ended up on my desk. I documented it for the company wiki in a “how things work” page showing what has happened on our project.

